Step-by-Step Guide: Training a Custom Object Detection Model in AI Builder
- Sivakumar K
- Sep 28, 2025
- 5 min read

Have you ever wished you could just point your phone at something and let AI tell you what it is? That’s exactly what Microsoft’s AI Builder Custom Object Detection model makes possible—without writing a single line of code.
In this article, we’ll explore how you can train your own model to recognize and locate objects in images. For our demo, we’ll use some generic examples like humans, animals, vehicles, and trees. The process is the same no matter what your scenario is—whether you’re detecting empty retail shelves, identifying defective parts in manufacturing, or checking if visitors are wearing safety helmets. By the end, you’ll see just how easy it is to go from uploading images to having a working AI model that plugs directly into Power Apps and Power Automate.
Step 1: Create a Custom Object Detection Model
Go to make.powerautomate.com and sign in.
From the left navigation, click on AI Models.
Choose Custom Object Detection as the model type.
Next, you’ll be asked to select a domain. AI Builder gives you three options:
Common Objects
Objects on Retail Shelves
Brand Logos
For this walkthrough, we’ll select Common Objects since we’re training the model to detect generic items like humans, animals, vehicles, and trees. Once selected, click Next to continue.


Step 2: Define the Objects
In this step, you’ll define the objects you want your model to recognise. These objects act as labels that you’ll later use when tagging your images.
For example, in this tutorial, I’ve created four objects: Humans, Vehicles, Trees, and Animals.
It’s very straightforward:
Click on Add New Object.
Enter the name of the object (for example, “Human”).
Repeat the process for each object you want the model to detect.
These defined objects will become the categories your model learns to identify when you upload and tag images.

Step 3: Add Sample Images for Training
Now it’s time to upload the images that will be used to train your model.
Click on Add Images.
Select and upload all the sample images you’ve collected for training.
For this walkthrough, since one of the objects is Human, I uploaded images showing people in different scenarios—such as standing near a car, walking in a parking lot, at a traffic signal, in a park, or even playing with a dog.
Similarly, for Trees, I used a variety of images: trees in a park, a garden, a forest, or even in pictures where trees appear alongside cars and people.
👉 Best Practice:
Use at least 15 images per object to get started.
For better accuracy, aim for 50+ images per object.
The more diverse your images (different angles, lighting, and contexts), the smarter and more reliable your model will become.
Training images are the foundation of your model’s accuracy, so take time to collect the right variety of scenarios.

Step 4: Tagging the Images
Once your images are uploaded, the next step is tagging. Tagging tells the model where each object appears in the image.
Here’s how it works:
Each image will show up in the preview window.
On the right-side panel, you’ll see the list of objects you created earlier (Humans, Trees, Vehicles, Animals) along with a count of how many tags you’ve applied so far.
Use your mouse to draw a box around the object in the image (for example, draw a box around a person).
From the popup list, assign the tag to the correct object—like Human, Tree, or Animal.
If an image contains multiple objects (say a Human and a Dog), draw separate boxes and tag each one appropriately.
👉 Important:
Each object type needs at least 15 tagged references before you can move forward.
If you don’t have enough, go back, upload more images, and continue tagging until all objects meet the minimum.
Tagging may feel repetitive, but it’s a crucial step—it teaches the model exactly what to look for in different scenarios.


Step 5: Review Model Summary & Train the Model
Tagging images can be a bit time-consuming—the more objects you’ve defined, the longer it takes. Once you’ve finished tagging, AI Builder gives you a Model Summary. This page shows an overview of your objects, how many tags each one has, and the images you’ve uploaded.
At this stage, you can:
Review your setup to make sure everything looks correct.
Rename your model if needed (you can also rename it later, so don’t worry if you skip it now).
When you’re ready, click Train. Training time depends on the number of images and tags you’ve provided. Once completed successfully, the model will be ready with an accuracy score that tells you how well it can detect the objects you defined.


Step-6: Quick Test the Model
Before publishing, you can use the Quick Test feature to validate how well your model performs.
On the model page, click Quick Test.
Upload or drag an image that contains one or more of your defined objects (e.g., Human, Tree, Vehicle, or Animal).
The model will highlight and label the objects it detects, showing you a preview of its accuracy in real time.
This is a great way to confirm whether your model has been trained properly—or if you need to upload more images and refine your tagging for better results.
Once you’re happy with the test outcome, you can move on to publishing the model.
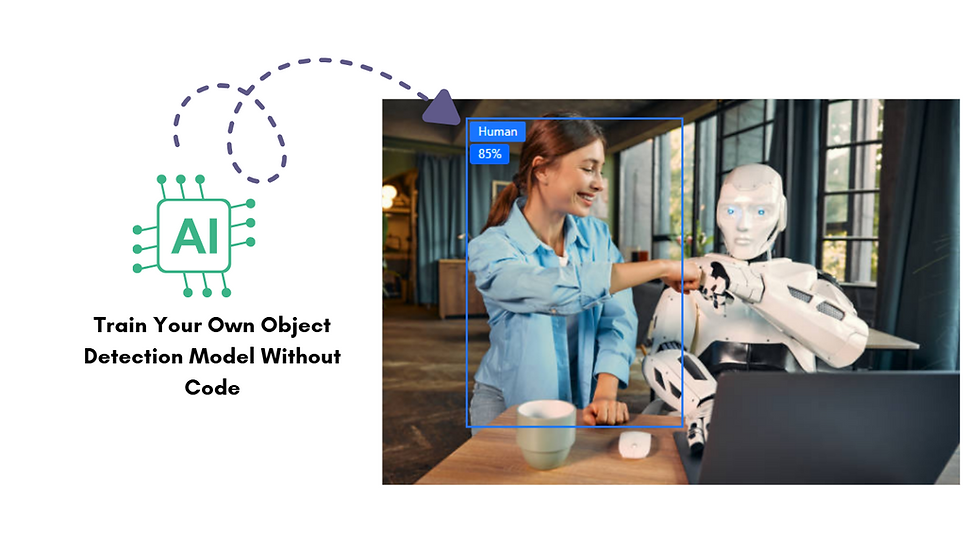
To see how the model performs, I ran a quick test with two sample images.
Here’s the outcome from my test:


The results confirm that the model is able to identify and tag multiple objects correctly. Of course, the accuracy improves as you add more diverse images during training.
What Next?
Step 7: Publish and Use the Model
Once you’re happy with the Quick Test results, click Publish.From here, your model is ready to use in Power Apps and Power Automate. For example:
Add the Process and detect objects in images action in a flow.
Connect the model in Power Apps to build an app where users upload images for detection.
You can refer to one of the sample Power Automate flows for AI models How to Use AI Builder and Power Automate to Extract Data from Bills & Receipts
I hope you found this guide helpful! If you have any questions or need support, feel free to leave a comment or reach out — I’ll be happy to help.


Comments