How to Create a Custom AI Model with No Code in Microsoft Power Platform
- Sivakumar K
- Sep 26, 2025
- 5 min read

While Microsoft provides plenty of pre-built AI models through AI Builder and AI Hub, not every scenario fits neatly into these templates. That’s where Custom AI Models come in. With no coding required, you can build and train your own model to extract exactly the kind of data your business needs.
In this article, we’ll walk through the process of building a custom model using Microsoft’s Power Platform
Why Build a Custom Model?
Pre-built models cover a wide range of scenarios like invoice processing, form recognition, sentiment analysis, and object detection. However, businesses often have unique documents, formats, or workflows. For example:
Extracting data from company-specific forms.
Recognizing patterns in industry-specific documents.
Training AI to understand custom terminology or data points.
Custom models give you the flexibility to train AI with your own sample data so the output is tailored to your exact requirements.
In this article, we’re going to explain — step by step — how to build and train your own custom model.
Step 1: Log in and Create a Custom Model
Go to make.powerautomate.com.
Navigate to AI Hub from the left panel.
Click on AI Models.
Select Extract custom information from documents.
Click Create Custom Model (as shown in the image below).
In the image below, you’ll notice that sample documents are shown on the left, while the extracted information is displayed on the right panel. This helps you quickly verify the results during model creation.

Step 2: Choose the Document Type
On this screen, you’ll be asked to select the type of document you want to process. You’ll see three options:
Fixed Template Document – Best suited for structured documents that follow a consistent layout.
General Documents – For unstructured data where no fixed format exists. Some file type options (like signatures) are not available here.
Invoices – Come with predefined invoice fields. You can also adjust or customise some of the formats as needed.
For this walkthrough, I’m selecting the Fixed Template Document option. The overall process remains mostly the same across all three types, with only minor differences in available features.


Step 3: Add the Fields You Want to Capture
In this step, you’ll define the fields that the model should extract from your document. For example, if you are working with a student admission form, the fields might include:
Student Name → Use the Text field type.
Date of Birth → Use the Date field type and set the desired format.
Class → Use the Number field type.
Admission Number → Use the Number or Text field type depending on the format.
Signature → Use the Signature field type.
Continue adding all the field names you want the model to capture, making sure to select the correct field type for each one.

Step 4: Create a Collection and Upload Sample Documents
Click on Create New Collection to generate a new collection.
Use the + (plus) icon to upload documents into the collection.
📌 Notes:
Add at least 5 documents with the same layout. Supported formats are .JPG, .PNG, or .PDF (up to 50 MB or 500 pages total).
A collection is a group of documents with similar layouts and wording. Creating collections helps your model consistently extract the same information from different documents.
You can create multiple collections, each with a minimum of 5 samples. If you have documents in different formats, organize them into separate collections for better accuracy.
After uploading the documents, the Next button will be active and click on Next to proceed to the next step. Refer to the images below.


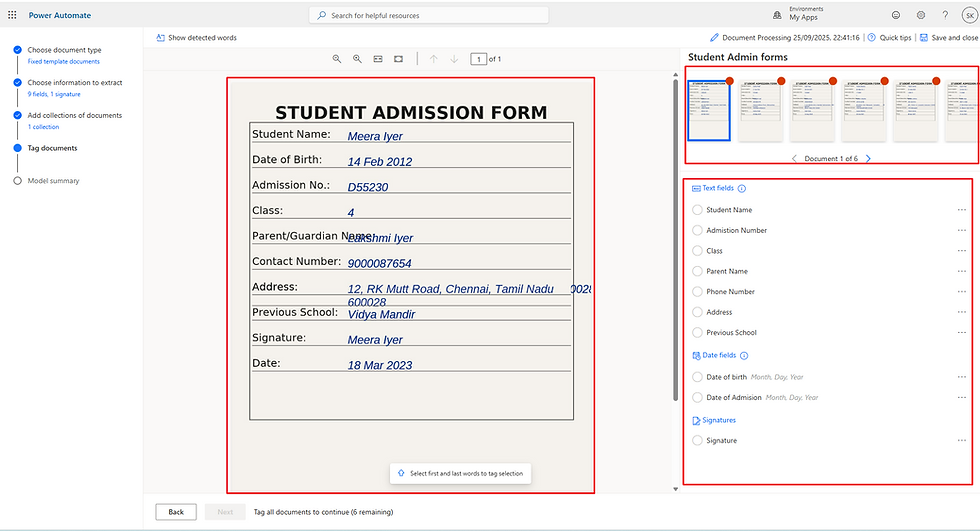
Step 5: Tag the Documents
On this screen, you’ll see the documents you uploaded to the collection. In my case, I’ve uploaded 6 documents.
On the right side, you’ll find the list of fields you created earlier.
In the center, you’ll see a preview of the selected document.
To tag a field:
Use your cursor to highlight the value in the document (for example, the student’s name).
A pop-up will display the list of available fields.
Select the correct field (e.g., map the highlighted name to Student Name).
Repeat this process for all fields in the document.
⚠️ Important: You must complete tagging for all documents in the collection. If even one document remains untagged, you won’t be able to move forward to the next step.


Step 6: Model Summary and Train the Model
In this step, you’ll see a Model Summary that gives an overview of the information to be extracted, along with the sample examples you tagged earlier.
At the top, you can edit the model name to something meaningful so it’s easy to identify later.
You’ll also see the document source information (for example, in my case, the source is My Device).
Review the summary to ensure all fields and samples look correct.
Once everything is verified, click Train to start building your model.


That’s all — the AI will begin the backend process of training the model. Upon successful completion, you’ll see the model status as Ready along with a score that indicates its accuracy.
Final Step: Publish the Model
Once training is complete, simply click on Publish to activate the model. After publishing, your model will be ready to use in your apps and flows.

What’s Next?
Now that your custom AI model is trained and published, the next step is to use it inside a Power Automate cloud flow.
If you haven’t read my earlier article on using prebuilt models, I recommend checking that out first. How to Use AI Builder and Power Automate to Extract Data from Bills & Receipts The process is almost the same — the only key difference here is that you’ll select your custom AI model instead of a prebuilt one.
To get started:
Create a new Automated or Instant flow and add your trigger.
Click + New step → search and select Process documents (AI Builder).
In the action:
AI model: select the model you built and published.
Document: map the file content (e.g., from SharePoint/OneDrive trigger or a Get file content step).
Save and test the flow.


If your model doesn’t appear, make sure it’s Published, you’re in the same environment, you have the right permissions/credits, and try refreshing the action picker after a minute.
I hope you found this guide helpful! If you have any questions or need support, feel free to leave a comment or reach out — I’ll be happy to help.


Comments