How to Save Microsoft Forms File Attachments to SharePoint Using Power Automate
- Sivakumar K
- Dec 25, 2025
- 4 min read


In this article, we walk through a real-world scenario where lead information is captured using Microsoft Forms, including support for multiple file attachments.
The solution focuses on using Power Automate to automatically store the submitted form data into a SharePoint list, while securely saving all uploaded attachments in SharePoint.
Step 1: Create an Automated Cloud Flow for Microsoft Forms
Go to Power Automate and click Create.
Select Automated cloud flow as the flow type.
Give your flow a meaningful name (for example: Forms Leads to SharePoint).
Choose the trigger When a new response is submitted.
From the Form Id dropdown, select the Microsoft Form that is already capturing lead information and file attachments.
Click New step and add the action Get response details.
In Get response details:
Select the same Form Id
Map the Response Id from the trigger’s dynamic content
👉 This step ensures Power Automate can read all submitted form data, including text fields and attachment metadata, which will be used in the next steps to store data and files in SharePoint.

Step 2: Convert Microsoft Forms Attachment Data to JSON
Click New step in your flow.
Go to Built-in → Data Operations.
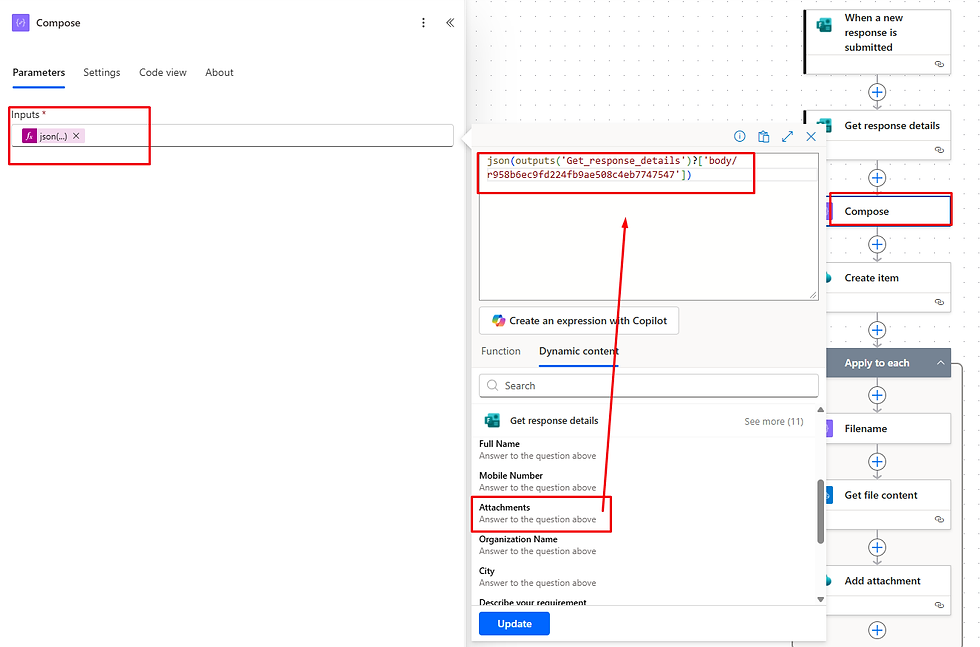
Select Compose.
Inside the Inputs field, switch to the Expression tab.
Enter the following expression:
json(outputs('Get_response_details')?['body/r958b6ec9fd224fb9ae508c4eb7747547'])
In this expression:
outputs('Get_response_details') is selected from Dynamic content
The value r958b6ec9fd224fb9ae508c4eb7747547 represents the Attachments (File Upload) field from the Microsoft Form
👉 Microsoft Forms returns attachment data as a string. Using the json() function converts it into a structured JSON array, allowing Power Automate to loop through multiple attachments in the upcoming steps.
Step 3: Create a SharePoint List Item Using Form Response Data
Click the ➕ plus icon below the previous action and select Add an action.
Search for the SharePoint connector.
Choose the action Create item.
Configure the action as follows:
Site Address: Select your SharePoint site where the list is created.
List Name: Choose the SharePoint list that stores the lead information.
Once the list is selected, all list columns will appear automatically.
Map each column by dynamically selecting values from the Get response details action, such as:
Lead Name
Email Address
Phone Number
Company Name
Any other fields captured in the Microsoft Form
👉 This step stores the submitted lead information into the SharePoint list. The created list item will later be used to associate and store the uploaded attachments in SharePoint, ensuring both data and documents stay linked.

Step 4: Use Apply to each to Loop Through Every Uploaded Attachment
Click New step (➕) after Create item.
Go to Control actions and select Apply to each.
In Select an output from previous steps, choose the Output from your Compose action (the one where you used json(...)).
✅ Now the flow will iterate through each attachment one by one inside the loop.
Why are we doing this?
Microsoft Forms stores uploaded files in a OneDrive for Business folder (linked to the form owner).SharePoint cannot attach files directly from that metadata — before we add attachments to the SharePoint list item, we must:
Read attachment details (name, link/id) for each file
Find the actual file in OneDrive
Get the file content
Attach it to the SharePoint item created in Step 3
By using Apply to each, Power Automate can dynamically process multiple attachments, and you don’t need separate steps for each file.

Step 5: Capture Each Attachment File Name (Inside Apply to each)
Inside the Apply to each loop, click Add an action.
Go to Built-in → Data Operations → select Compose.
Rename the action (optional but recommended) to: Compose – File Name
In the Inputs field, go to the Expression tab and enter:
item()?['name']
What this does:
item() refers to the current attachment object being processed inside the loop.
['name'] extracts the file name (example: LeadDoc.pdf, PAN.png, etc.)

Step 6: Get File Content from OneDrive for Business (Inside the Loop)
Inside the same Apply to each loop, click Add an action.
Search for OneDrive for Business connector.
Select the action Get file content.
In the File (or File Identifier) field:
Click the field → go to the Expression tab
Enter this expression:
item()?['id']
Why this is needed:
Microsoft Forms uploads all attachments into the form owner’s OneDrive for Business folder. To attach the file into SharePoint, Power Automate must first read the actual binary file content. Using item()?['id'] ensures that for each loop iteration, the flow dynamically picks the correct attachment file and fetches its content.

Step 7 (Final): Add Each File as an Attachment to the SharePoint List Item
Inside the same Apply to each loop, click Add an action.
Search for SharePoint connector.
Select the action Add attachment.
Configure the Add attachment action:
Site Address: Select your SharePoint site
List Name: Select the same list used in Create item
ID:Use Dynamic content → from the Create item action → select ID (only the ID field)
File Name:Use the output from your Compose – File Name action (inside the loop)
File Content:Use the output from OneDrive for Business – Get file content (inside the loop)
✅ What happens now:For every attachment submitted in Microsoft Forms, the flow will:
pick the file from OneDrive using its id
read the file content
attach it to the exact SharePoint list item created in Step 3
🎉 That’s it — your flow will store the lead data in SharePoint list and also store all uploaded files as list attachments, even when users upload multiple files.

Step 8: Test the Flow and Verify SharePoint Output
Click Save on your flow.
Click Test (top-right) and choose Manually.
Open your Microsoft Form and submit a sample lead entry.
Make sure you upload one or multiple attachments during submission.
Go back to Power Automate and confirm the flow run status is Succeeded.
Now open your SharePoint list (the list you mapped in Create item):
You should see the new lead record created
Open the item and check the Attachments section
You’ll find the uploaded files added successfully as attachments
Final Result:Your Microsoft Forms submission is stored in SharePoint as a list item, and all uploaded files are also stored as attachments against that same record.

If you found this blog article helpful, please like and share it with others who may benefit from it. Feel free to drop a comment if you need any support or clarification—I’ll be happy to help.


Comments